3.1 Required Math Concepts
Numeral System and Notation
It is often said that mathematics is the language of science. If this is true, then an essential part of the language of mathematics is numbers. The earliest use of numbers occurred 100 centuries ago in the Middle East to count, or enumerate items. Farmers, cattlemen, and tradesmen used tokens, stones, or markers to signify a single quantity—a sheaf of grain, a head of livestock, or a fixed length of cloth, for example. Doing so made commerce possible, leading to improved communications and the spread of civilization.
Three to four thousand years ago, Egyptians introduced fractions. They first used them to show reciprocals. Later, they used them to represent the amount when a quantity was divided into equal parts.
But what if there were no cattle to trade or an entire crop of grain was lost in a flood? How could someone indicate the existence of nothing? From earliest times, people had thought of a “base state” while counting and used various symbols to represent this null condition. However, it was not until about the fifth century A.D. in India that zero was added to the number system and used as a numeral in calculations.
Clearly, there was also a need for numbers to represent loss or debt. In India, in the seventh century A.D., negative numbers were used as solutions to mathematical equations and commercial debts. The opposites of the counting numbers expanded the number system even further.
Because of the evolution of the number system, we can now perform complex calculations using these and other categories of real numbers. In this section, we will explore sets of numbers, calculations with different kinds of numbers, and the use of numbers in expressions.
Numbers
Natural numbers
The numbers we use for counting, or enumerating items, are the natural numbers: 1, 2, 3, 4, 5, and so on. We describe them in set notation as {1,2,3,…} where the ellipsis (…) indicates that the numbers continue to infinity. The natural numbers are, of course, also called the counting numbers. Any time we enumerate the members of a team, count the coins in a collection, or tally the trees in a grove, we are using the set of natural numbers.
Whole numbers
If we add zero to the counting numbers, we get the set of whole numbers.
- Counting Numbers: 1, 2, 3, …
- Whole Numbers: 0, 1, 2, 3, …
Integers
A set of integers adds the opposites of the natural numbers to the set of whole numbers:{…,−3,−2,−1,0,1,2,3,…}. It is useful to note that the set of integers is made up of three distinct subsets: negative integers, zero, and positive integers. In this sense, the positive integers are just the natural numbers. Another way to think about it is that the natural numbers are a subset of the integers.
![]()
Fractions
Often in life, whole amounts are not exactly what we need. A baker must use a little more than a cup of milk or part of a teaspoon of sugar. Similarly a carpenter might need less than a foot of wood and a painter might use part of a gallon of paint. These people need to use numbers which are part of a whole. These numbers are very useful both in algebra and in everyday life and they are called factions. Hence, Fractions are a way to represent parts of a whole. It is written ![]() where
where ![]() and
and ![]() are integers and
are integers and ![]() In a fraction,
In a fraction, ![]() is called the numerator and
is called the numerator and ![]() is called the denominator. The denominator
is called the denominator. The denominator ![]() represents the number of equal parts the whole has been divided into, and the numerator
represents the number of equal parts the whole has been divided into, and the numerator ![]() represents how many parts are included. The denominator,
represents how many parts are included. The denominator, ![]() cannot equal zero because division by zero is undefined.
cannot equal zero because division by zero is undefined.
In (Figure), the circle has been divided into three parts of equal size. Each part represents ![]() of the circle. This type of model is called a fraction circle. Other shapes, such as rectangles, can also be used to model fractions.
of the circle. This type of model is called a fraction circle. Other shapes, such as rectangles, can also be used to model fractions.
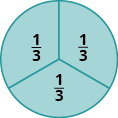
What does the fraction ![]() represent? The fraction
represent? The fraction ![]() means two of three equal parts.
means two of three equal parts.

Improper and Proper Fractions
In an improper fraction, the numerator is greater than or equal to the denominator, so its value is greater than or equal to one. Fractions such as ![]() ,
, ![]() ,
, ![]() , and
, and ![]() are called improper fractions.
are called improper fractions.
When a fraction has a numerator that is smaller than the denominator, it is called a proper fraction, and its value is less than one. Fractions such as ![]() ,
, ![]() , and
, and ![]() are proper fractions.
are proper fractions.
Equivalent Fractions
Equivalent fractions are fractions that have the same value. For example, the fractions ![]() and
and ![]() have the same value, 1. Figure shows two images: a single pizza on the left, cut into two equal pieces, and a second pizza of the same size, cut into eight pieces on the right. This is a way to show that
have the same value, 1. Figure shows two images: a single pizza on the left, cut into two equal pieces, and a second pizza of the same size, cut into eight pieces on the right. This is a way to show that ![]() is equivalent to
is equivalent to ![]() . In other words, they are equivalent fractions.
. In other words, they are equivalent fractions.

Figure #. Since the same amount is of each pizza is shaded, we see that ![]() is equivalent to
is equivalent to ![]() .
.
Add or Subtract Fractions
To add or subtract fractions, they must have a common denominator. If the factions have the same denominator, we just add the numerators and place the sum over the common denominator. If the fractions have different denominators, what do we need to do?
First, we will use fraction tiles to model finding the common denominator of ![]() and
and ![]()
We’ll start with one ![]() tile and
tile and ![]() tile. We want to find a common fraction tile that we can use to match both
tile. We want to find a common fraction tile that we can use to match both ![]() and
and ![]() exactly.
exactly.
If we try the ![]() pieces,
pieces, ![]() of them exactly match the
of them exactly match the ![]() piece, but they do not exactly match the
piece, but they do not exactly match the ![]() piece.
piece.

If we try the ![]() pieces, they do not exactly cover the
pieces, they do not exactly cover the ![]() piece or the
piece or the ![]() piece.
piece.

If we try the ![]() pieces, we see that exactly
pieces, we see that exactly ![]() of them cover the
of them cover the ![]() piece, and exactly
piece, and exactly ![]() of them cover the
of them cover the ![]() piece.
piece.

If we were to try the ![]() pieces, they would also work.
pieces, they would also work.

Even smaller tiles, such as ![]() and
and ![]() would also exactly cover the
would also exactly cover the ![]() piece and the
piece and the ![]() piece.
piece.
The denominator of the largest piece that covers both fractions is the least common denominator (LCD) of the two fractions. So, the least common denominator of ![]() and
and ![]() is
is ![]()
Notice that all of the tiles that cover ![]() and
and ![]() have something in common: Their denominators are common multiples of
have something in common: Their denominators are common multiples of ![]() and
and ![]() the denominators of
the denominators of ![]() and
and ![]() The least common multiple (LCM) of the denominators is
The least common multiple (LCM) of the denominators is ![]() and so we say that
and so we say that ![]() is the least common denominator (LCD) of the fractions
is the least common denominator (LCD) of the fractions ![]() and
and ![]() . Therefore, the least common denominator (LCD) of two fractions is the least common multiple (LCM) of their denominators.
. Therefore, the least common denominator (LCD) of two fractions is the least common multiple (LCM) of their denominators.
To find the LCD of two fractions, we will find the LCM of their denominators. We follow the procedure we used earlier to find the LCM of two numbers. We only use the denominators of the fractions, not the numerators, when finding the LCD.
Find the LCD for the fractions ![]() and
and ![]()
| Factor each denominator into its primes. | 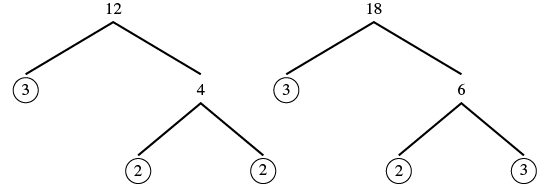 |
| List the primes of 12 and the primes of 18 lining them up in columns when possible. |  |
| Bring down the columns. |  |
| Multiply the factors. The product is the LCM. | |
| The LCM of 12 and 18 is 36, so the LCD of |
LCD of |
Fractions addition and subtraction trick – do them the fast way!
Multiply Fractions
When we multiplied fractions, we just multiplied the numerators and multiplied the denominators right straight across.
A model may help you understand multiplication of fractions. We will use fraction tiles to model ![]() To multiply
To multiply ![]() and
and ![]() think
think ![]() of
of ![]()
Start with fraction tiles for three-fourths. To find one-half of three-fourths, we need to divide them into two equal groups. Since we cannot divide the three ![]() tiles evenly into two parts, we exchange them for smaller tiles.
tiles evenly into two parts, we exchange them for smaller tiles.
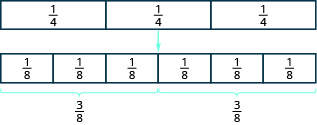
We see ![]() is equivalent to
is equivalent to ![]() Taking half of the six
Taking half of the six ![]() tiles gives us three
tiles gives us three ![]() tiles, which is
tiles, which is ![]()
Therefore, ![]()
When multiplying fractions, the properties of positive and negative numbers still apply. It is a good idea to determine the sign of the product as the first step. In Example 4.26 we will multiply two negatives, so the product will be positive.
Multiply, and write the answer in simplified form: ![]()
| The signs are the same, so the product is positive. Multiply the numerators, multiply the denominators. | |
| Simplify. | |
| Look for common factors in the numerator and denominator. Rewrite showing common factors. |  |
| Remove common factors. |
Another way to find this product involves removing common factors earlier.
| Determine the sign of the product. Multiply. | |
| Show common factors and then remove them. |  |
| Multiply remaining factors. |
We get the same result.
Multiplying two fractions: Example
Divide Fractions
Now that we know how to multiply fractions, we are almost ready to divide. Before we can do that, that we need some vocabulary.
The reciprocal of a fraction is found by inverting the fraction, placing the numerator in the denominator and the denominator in the numerator. The reciprocal of ![]() is
is ![]() .
.
Notice that ![]() ·
· ![]() = 1. A number and its reciprocal multiply to 1.
= 1. A number and its reciprocal multiply to 1.
To get a product of positive 1 when multiplying two numbers, the numbers must have the same sign. So reciprocals must have the same sign.
The reciprocal of − ![]() is –
is – ![]() , since −
, since − ![]()
![]() ) = 1 .
) = 1 .
Dividing Fractions: Example
Decimals
You probably already know quite a bit about decimals based on your experience with money. Suppose you buy a sandwich and a bottle of water for lunch. If the sandwich costs ![]() , the bottle of water costs
, the bottle of water costs ![]() , and the total sales tax is
, and the total sales tax is ![]() , what is the total cost of your lunch?
, what is the total cost of your lunch?

The total is ![]() Suppose you pay with a
Suppose you pay with a ![]() bill and
bill and ![]() pennies. Should you wait for change? No,
pennies. Should you wait for change? No, ![]() and
and ![]() pennies is the same as
pennies is the same as ![]()
Because ![]() each penny is worth
each penny is worth ![]() of a dollar. We write the value of one penny as
of a dollar. We write the value of one penny as ![]() since
since ![]()
Decimals are in fact another way of writing fractions whose denominators are powers of 10.
Just as the counting numbers are based on powers of ten, decimals are based on powers of ten. (Figure) shows the counting numbers.
| Counting number | Name |
|---|---|
| One | |
| Ten | |
| One hundred | |
| One thousand | |
| Ten thousand |
How are decimals related to fractions? (Figure) shows the relation.
| Decimal | Fraction | Name |
|---|---|---|
| One tenth | ||
| One hundredth | ||
| One thousandth | ||
| One ten-thousandth |
Add and Subtract Decimals
Let’s take one more look at the lunch order from the start of Decimals, this time noticing how the numbers were added together.

All three items (sandwich, water, tax) were priced in dollars and cents, so we lined up the dollars under the dollars and the cents under the cents, with the decimal points lined up between them. Then we just added each column, as if we were adding whole numbers. By lining up decimals this way, we can add or subtract the corresponding place values just as we did with whole numbers.
- Write the numbers vertically so the decimal points line up.
- Use zeros as place holders, as needed.
- Add or subtract the numbers as if they were whole numbers. Then place the decimal in the answer under the decimal points in the given numbers.
Multiply Decimals
Multiplying decimals is very much like multiplying whole numbers—we just have to determine where to place the decimal point. The procedure for multiplying decimals will make sense if we first review multiplying fractions.
Do you remember how to multiply fractions? To multiply fractions, you multiply the numerators and then multiply the denominators.
So let’s see what we would get as the product of decimals by converting them to fractions first. We will do two examples side-by-side in (Figure). Look for a pattern.
| A | B | |
|---|---|---|
| Convert to fractions. | ||
| Multiply. | ||
| Convert back to decimals. |
There is a pattern that we can use. In A, we multiplied two numbers that each had one decimal place, and the product had two decimal places. In B, we multiplied a number with one decimal place by a number with two decimal places, and the product had three decimal places.
How many decimal places would you expect for the product of ![]() If you said “five”, you recognized the pattern. When we multiply two numbers with decimals, we count all the decimal places in the factors—in this case two plus three—to get the number of decimal places in the product—in this case five.
If you said “five”, you recognized the pattern. When we multiply two numbers with decimals, we count all the decimal places in the factors—in this case two plus three—to get the number of decimal places in the product—in this case five.

Once we know how to determine the number of digits after the decimal point, we can multiply decimal numbers without converting them to fractions first. The number of decimal places in the product is the sum of the number of decimal places in the factors.
The rules for multiplying positive and negative numbers apply to decimals, too, of course.
When multiplying two numbers,
- if their signs are the same, the product is positive.
- if their signs are different, the product is negative.
When you multiply signed decimals, first determine the sign of the product and then multiply as if the numbers were both positive. Finally, write the product with the appropriate sign.
- Determine the sign of the product.
- Write the numbers in vertical format, lining up the numbers on the right.
- Multiply the numbers as if they were whole numbers, temporarily ignoring the decimal points.
- Place the decimal point. The number of decimal places in the product is the sum of the number of decimal places in the factors. If needed, use zeros as placeholders.
- Write the product with the appropriate sign.
Multiplying Decimals: Example
Multiply by Powers of 
In many fields, especially in the sciences, it is common to multiply decimals by powers of ![]() Let’s see what happens when we multiply
Let’s see what happens when we multiply ![]() by some powers of
by some powers of ![]()

Look at the results without the final zeros. Do you notice a pattern?

The number of places that the decimal point moved is the same as the number of zeros in the power of ten. (Figure) summarizes the results.
| Multiply by | Number of zeros | Number of places decimal point moves |
|---|---|---|
We can use this pattern as a shortcut to multiply by powers of ten instead of multiplying using the vertical format. We can count the zeros in the power of ![]() and then move the decimal point that same of places to the right.
and then move the decimal point that same of places to the right.
So, for example, to multiply ![]() by
by ![]() move the decimal point
move the decimal point ![]() places to the right.
places to the right.

Sometimes when we need to move the decimal point, there are not enough decimal places. In that case, we use zeros as placeholders. For example, let’s multiply ![]() by
by ![]() We need to move the decimal point
We need to move the decimal point ![]() places to the right. Since there is only one digit to the right of the decimal point, we must write a
places to the right. Since there is only one digit to the right of the decimal point, we must write a ![]() in the hundredths place.
in the hundredths place.

- Move the decimal point to the right the same number of places as the number of zeros in the power of

- Write zeros at the end of the number as placeholders if needed.
Divide Decimals
Just as with multiplication, division of decimals is very much like dividing whole numbers. We just have to figure out where the decimal point must be placed.
To understand decimal division, let’s consider the multiplication problem
Remember, a multiplication problem can be rephrased as a division problem. So we can write
We can think of this as “If we divide 8 tenths into four groups, how many are in each group?” (Figure) shows that there are four groups of two-tenths in eight-tenths. So ![]()

Using long division notation, we would write

Notice that the decimal point in the quotient is directly above the decimal point in the dividend.
To divide a decimal by a whole number, we place the decimal point in the quotient above the decimal point in the dividend and then divide as usual. Sometimes we need to use extra zeros at the end of the dividend to keep dividing until there is no remainder.
- Write as long division, placing the decimal point in the quotient above the decimal point in the dividend.
- Divide as usual.
Divide a Decimal by Another Decimal
So far, we have divided a decimal by a whole number. What happens when we divide a decimal by another decimal? Let’s look at the same multiplication problem we looked at earlier, but in a different way.
Remember, again, that a multiplication problem can be rephrased as a division problem. This time we ask, “How many times does ![]() go into
go into ![]() Because
Because ![]() we can say that
we can say that ![]() goes into
goes into ![]() four times. This means that
four times. This means that ![]() divided by
divided by ![]() is
is ![]()

We would get the same answer, ![]() if we divide
if we divide ![]() by
by ![]() both whole numbers. Why is this so? Let’s think about the division problem as a fraction.
both whole numbers. Why is this so? Let’s think about the division problem as a fraction.
We multiplied the numerator and denominator by ![]() and ended up just dividing
and ended up just dividing ![]() by
by ![]() To divide decimals, we multiply both the numerator and denominator by the same power of
To divide decimals, we multiply both the numerator and denominator by the same power of ![]() to make the denominator a whole number. Because of the Equivalent Fractions Property, we haven’t changed the value of the fraction. The effect is to move the decimal points in the numerator and denominator the same number of places to the right.
to make the denominator a whole number. Because of the Equivalent Fractions Property, we haven’t changed the value of the fraction. The effect is to move the decimal points in the numerator and denominator the same number of places to the right.
We use the rules for dividing positive and negative numbers with decimals, too. When dividing signed decimals, first determine the sign of the quotient and then divide as if the numbers were both positive. Finally, write the quotient with the appropriate sign.
It may help to review the vocabulary for division:
![]()
- Determine the sign of the quotient.
- Make the divisor a whole number by moving the decimal point all the way to the right. Move the decimal point in the dividend the same number of places to the right, writing zeros as needed.
- Divide. Place the decimal point in the quotient above the decimal point in the dividend.
- Write the quotient with the appropriate sign.
Dividing Decimals – Example
Exponents
An exponent indicates repeated multiplication of the same quantity. For example, 24 means to multiply four factors of 2, so 24 means 2·2·2·2. This format is known as exponential notation.

This is read a to the mth power.
In the expression am, the exponent tells us how many times we use the base a as a factor.

Square
Do you know why we use the word square? If we construct a square with three tiles on each side, the total number of tiles would be nine.

This is why we say that the square of three is nine.
32 = 9
What happens when you square a negative number?
(-8)2 = (-8) (-8) = 64
When we multiply two negative numbers, the product is always positive. So the square of a negative number is always positive.
Cube
Square Roots
Sometimes we will need to look at the relationship between numbers and their squares in reverse. Because 102=100, we say 100 is the square of 10. We can also say that 10 is a square root of 100.
A number whose square is m is called a square root of m.
If n2=m, then n is a square root of m.
Notice (−10)2=100 also, so −10 is also a square root of 100. Therefore, both 10 and −10 are square roots of 100.
So, every positive number has two square roots: one positive and one negative.
What if we only want the positive square root of a positive number? The radical sign, √, stands for the positive square root. The positive square root is also called the principal square root.
√m is read as “the square root of m.
If m=n2, then m = n for n≥0. If m = n2, then m= n for n≥0.
![]()
We can also use the radical sign for the square root of zero. Because 02=0, √0=0. Notice that zero has only one square root.

Square Root of a Negative Number
Can we simplify √−25? Is there a number whose square is −25?
None of the numbers that we have dealt with so far have a square that is −25. Why? Any positive number squared is positive, and any negative number squared is also positive. There is no real number equal to −25. If we are asked to find the square root of any negative number, we say that the solution is not a real number.
Estimate Square Roots (done)
So far we have only worked with square roots of perfect squares. The square roots of other numbers are not whole numbers.

We might conclude that the square roots of numbers between 4 and 9 will be between 2 and 3, and they will not be whole numbers. Based on the pattern in the table above, we could say that √5 is between 2 and 3. Using inequality symbols, we write 2<√5<3
Approximate Square Roots with a Calculator
There are mathematical methods to approximate square roots, but it is much more convenient to use a calculator to find square roots. Find the √ or √x key on your calculator. You will to use this key to approximate square roots. When you use your calculator to find the square root of a number that is not a perfect square, the answer that you see is not the exact number. It is an approximation, to the number of digits shown on your calculator’s display. The symbol for an approximation is ≈ and it is read approximately.
Suppose your calculator has a 10-digit display. Using it to find the square root of 5 will give 2.236067977. This is the approximate square root of 5. When we report the answer, we should use the “approximately equal to” sign instead of an equal sign.
You will seldom use this many digits for applications in algebra. So, if you wanted to round √5 to two decimal places, you would write
How do we know these values are approximations and not the exact values? Look at what happens when we square them.
The squares are close, but not exactly equal, to 5.
Introduction to Exponents
Ratios
When you apply for a mortgage, the loan officer will compare your total debt to your total income to decide if you qualify for the loan. This comparison is called the debt-to-income ratio. A ratio compares two quantities that are measured with the same unit. If we compare ![]() and
and ![]() , the ratio is written as
, the ratio is written as ![]()
Ratios Involving Decimals
We will often work with ratios of decimals, especially when we have ratios involving money. In these cases, we can eliminate the decimals by using the Equivalent Fractions Property to convert the ratio to a fraction with whole numbers in the numerator and denominator.
For example, consider the ratio ![]() We can write it as a fraction with decimals and then multiply the numerator and denominator by
We can write it as a fraction with decimals and then multiply the numerator and denominator by ![]() to eliminate the decimals.
to eliminate the decimals.

Do you see a shortcut to find the equivalent fraction? Notice that ![]() and
and ![]() The least common denominator of
The least common denominator of ![]() and
and ![]() is
is ![]() By multiplying the numerator and denominator of
By multiplying the numerator and denominator of ![]() by
by ![]() we ‘moved’ the decimal two places to the right to get the equivalent fraction with no decimals. Now that we understand the math behind the process, we can find the fraction with no decimals like this:
we ‘moved’ the decimal two places to the right to get the equivalent fraction with no decimals. Now that we understand the math behind the process, we can find the fraction with no decimals like this:
| “Move” the decimal 2 places. | |
| Simplify. |
You do not have to write out every step when you multiply the numerator and denominator by powers of ten. As long as you move both decimal places the same number of places, the ratio will remain the same.
Perimeter, Area, and Volume
Perimeter and Area
The perimeter is a measure of the distance around a figure. The area is a measure of the surface covered by a figure.
Square
(Figure) shows a square tile that is 1 inch on each side. If an ant walked around the edge of the tile, it would walk 4 inches. This distance is the perimeter of the tile. Since the tile is a square that is 1 inch on each side, its area is one square inch. The area of a shape is measured by determining how many square units cover the shape.
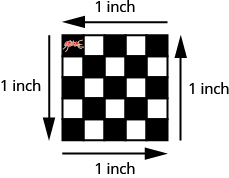
Figure #. Perimeter = 4 inches Area = 1 square inch
When the ant walks completely around the tile on its edge, it is tracing the perimeter of the tile. The area of the tile is 1 square inch.
Rectangle
A rectangle has four sides and four right angles. The opposite sides of a rectangle are the same length. We refer to one side of the rectangle as the length, L, and the adjacent side as the width, W. See (Figure).

The perimeter, P, of the rectangle is the distance around the rectangle. If you started at one corner and walked around the rectangle, you would walk L+W+L+W units, or two lengths and two widths. The perimeter then is
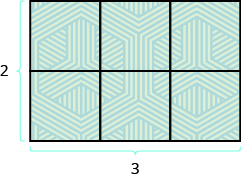
What about the area of a rectangle? Remember the rectangular rug from the beginning of this section. It was 2 feet long by 3 feet wide, and its area was 6 square feet. See (Figure). Since A=2⋅3, we see that the area, A, is the length, L, times the width, W, so the area of a rectangle is A=L⋅W.
Triangle
We now know how to find the area of a rectangle. We can use this fact to help us visualize the formula for the area of a triangle. In the rectangle in (Figure), we’ve labeled the length b and the width h, so it’s area is bh.

We can divide this rectangle into two congruent triangles (Figure). Triangles that are congruent have identical side lengths and angles, and so their areas are equal. The area of each triangle is one-half the area of the rectangle, or ![]() bh. This example helps us see why the formula for the area of a triangle is A=
bh. This example helps us see why the formula for the area of a triangle is A= ![]() bh.
bh.

The formula for the area of a triangle is A = ![]() bh, where b is the base and h is the height.
bh, where b is the base and h is the height.
To find the area of the triangle, you need to know its base and height. The base is the length of one side of the triangle, usually the side at the bottom. The height is the length of the line that connects the base to the opposite vertex, and makes a 90° angle with the base. (Figure) shows three triangles with the base and height of each marked.

Isosceles and Equilateral Triangles
Besides the right triangle, some other triangles have special names. A triangle with two sides of equal length is called an isosceles triangle. A triangle that has three sides of equal length is called an equilateral triangle. (Figure) shows both types of triangles.

- An isosceles triangle has two sides the same length.
- An equilateral triangle has three sides of equal length.
Trapezoid
A trapezoid is four-sided figure, a quadrilateral, with two sides that are parallel and two sides that are not. The parallel sides are called the bases. We call the length of the smaller base b, and the length of the bigger base B. The height, h, of a trapezoid is the distance between the two bases as shown in (Figure).
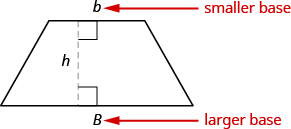
The formula for the area of a trapezoid is:
Splitting the trapezoid into two triangles may help us understand the formula. The area of the trapezoid is the sum of the areas of the two triangles. See (Figure).
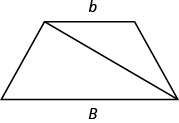
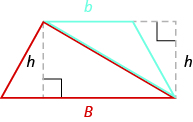
The formula for the area of a trapezoid is
![]()
If we distribute, we get,

Circle
The properties of circles have been studied for over ![]() years. All circles have exactly the same shape, but their sizes are affected by the length of the radius, a line segment from the center to any point on the circle. A line segment that passes through a circle’s center connecting two points on the circle is called a diameter. The diameter is twice as long as the radius. See (Figure).
years. All circles have exactly the same shape, but their sizes are affected by the length of the radius, a line segment from the center to any point on the circle. A line segment that passes through a circle’s center connecting two points on the circle is called a diameter. The diameter is twice as long as the radius. See (Figure).
The size of a circle can be measured in two ways. The distance around a circle is called its circumference.

Archimedes discovered that for circles of all different sizes, dividing the circumference by the diameter always gives the same number. The value of this number is pi, symbolized by Greek letter ![]() (pronounced pie). However, the exact value of
(pronounced pie). However, the exact value of ![]() cannot be calculated since the decimal never ends or repeats (we will learn more about numbers like this in The Properties of Real Numbers.)
cannot be calculated since the decimal never ends or repeats (we will learn more about numbers like this in The Properties of Real Numbers.)
If we want the exact circumference or area of a circle, we leave the symbol ![]() in the answer. We can get an approximate answer by substituting
in the answer. We can get an approximate answer by substituting ![]() as the value of
as the value of ![]() We use the symbol
We use the symbol ![]() to show that the result is approximate, not exact.
to show that the result is approximate, not exact.
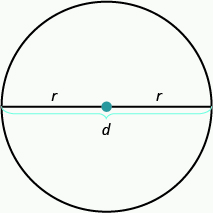
Since the diameter is twice the radius, another way to find the circumference is to use the formula ![]()
Suppose we want to find the exact area of a circle of radius ![]() inches. To calculate the area, we would evaluate the formula for the area when
inches. To calculate the area, we would evaluate the formula for the area when ![]() inches and leave the answer in terms of
inches and leave the answer in terms of ![]()

We write ![]() after the
after the ![]() So the exact value of the area is
So the exact value of the area is ![]() square inches.
square inches.
To approximate the area, we would substitute ![]()

Remember to use square units, such as square inches, when you calculate the area.
Sphere
A sphere is the shape of a basketball, like a three-dimensional circle. Just like a circle, the size of a sphere is determined by its radius, which is the distance from the center of the sphere to any point on its surface. The formulas for the volume and surface area of a sphere are given below.
Showing where these formulas come from, like we did for a rectangular solid, is beyond the scope of this course. We will approximate ππ with 3.14.
For a sphere with radius r:

Cube or Rectangle
A cube is a rectangular solid whose length, width, and height are equal. See Volume and Surface Area of a Cube, below. Substituting, s for the length, width and height into the formulas for volume and surface area of a rectangular solid, we get:
So for a cube, the formulas for volume and surface area are V=s3 and S=6s2.
For any cube with sides of length s,

Cylinder
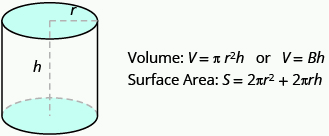
If you have ever seen a can of soda, you know what a cylinder looks like. A cylinder is a solid figure with two parallel circles of the same size at the top and bottom. The top and bottom of a cylinder are called the bases. The height h of a cylinder is the distance between the two bases. For all the cylinders we will work with here, the sides and the height, h, will be perpendicular to the bases.
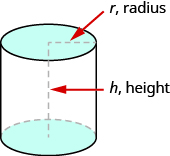
Rectangular solids and cylinders are somewhat similar because they both have two bases and a height. The formula for the volume of a rectangular solid, V=Bh, can also be used to find the volume of a cylinder.
For the rectangular solid, the area of the base, B, is the area of the rectangular base, length × width. For a cylinder, the area of the base, B, is the area of its circular base, πr2. (Figure) compares how the formula V=Bh is used for rectangular solids and cylinders.

To understand the formula for the surface area of a cylinder, think of a can of vegetables. It has three surfaces: the top, the bottom, and the piece that forms the sides of the can. If you carefully cut the label off the side of the can and unroll it, you will see that it is a rectangle. See (Figure).
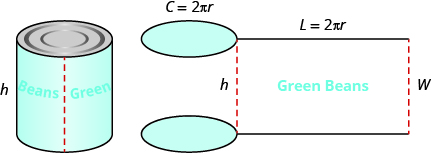
The distance around the edge of the can is the circumference of the cylinder’s base it is also the length L of the rectangular label. The height of the cylinder is the width W of the rectangular label. So the area of the label can be represented as

To find the total surface area of the cylinder, we add the areas of the two circles to the area of the rectangle.
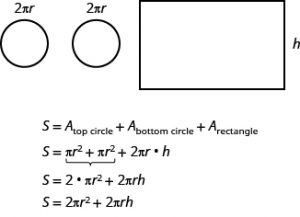
The surface area of a cylinder with radius r and height h, is S=2πr2+2πrh
For a cylinder with radius r and height h:
Cone
The first image that many of us have when we hear the word ‘cone’ is an ice cream cone. There are many other applications of cones (but most are not as tasty as ice cream cones). In this section, we will see how to find the volume of a cone.
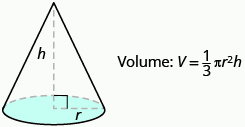
In geometry, a cone is a solid figure with one circular base and a vertex. The height of a cone is the distance between its base and the vertex.The cones that we will look at in this section will always have the height perpendicular to the base. See (Figure).
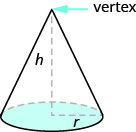
Earlier in this section, we saw that the volume of a cylinder is V=πr2h. We can think of a cone as part of a cylinder. (Figure) shows a cone placed inside a cylinder with the same height and same base. If we compare the volume of the cone and the cylinder, we can see that the volume of the cone is less than that of the cylinder.

In fact, the volume of a cone is exactly one-third of the volume of a cylinder with the same base and height. The volume of a cone is
![]()
Since the base of a cone is a circle, we can substitute the formula of area of a circle, πr2 , for B to get the formula for volume of a cone.
![]()
Volume of a Cone
For a cone with radius r and height h.
Weights and Measures Conversion Tables
Liquid Measure |
| 8 ounces = 1 cup |
| 2 cups= 1 pint |
| 16 ounces= 1 pint |
| 4 cups= 1 quart |
| 2 pints= 1 quart |
| 4 quarts= 1 gallon |
| 3 teaspoons= 1 tablespoon |
| 2 tablespoons= 1/8 cup or 1 fluid ounce |
| 4 tablespoons= 1/4 cup |
| 8 tablespoons= 1/2 cup |
| 1 teaspoon= 60 drops |
Conversion of US Liquid Measures to Metric System |
| 1 fluid ounce= 29.573 milliliters |
| 1 cup= 230 milliliters |
| 1 quart= .94635 liters |
| .033814 fluid ounce= 1 milliliter |
| 3.3814 fluid ounces= 1 deciliter |
| 33.814 fluid ounces or 1.0567 quarts= 1 liter |
Dry Measure |
| 2 pints= 1 quart |
| 4 quarts= 1 gallon |
| 8 quarts= 2 gallons or 1 peck |
| 4 pecks= 8 gallons or 1 bushel |
| 16 ounces= 1 pound |
| 2000 pounds= 1 ton |
Conversion of US Weight and Mass to Metric System |
| .0353 ounces= 1 gram |
| 1/4 ounce= 7 grams |
| 1 ounce= 28.35 grams |
| 4 ounces= 113.4 grams |
| 8 ounces= 226.8 grams |
| 1 pound= 454 grams |
| 2.2046 pounds= 1 kilogram |
| 1.1023 short tons= 1 metric ton |
Linear Measure |
| 12 inches= 1 foot |
| 3 feet= 1 yard |
| 5.5 yards= 1 rod |
| 40 rods= 1 furlong |
| 8 furlongs (5280 feet)= 1 mile |
| 6080 feet= 1 nautical mile |
Conversion of US Linear Measures to Metric System |
| 1 inch= 2.54 centimeters |
| 1 foot= .3048 meters |
| 1 yard= .9144 meters |
| 1 mile= 1609.3 meters or 1.6093 kilometers |
| .03937 inches= 1 millimeter |
| .3937 inches= 1 centimeter |
| 3.937 inches= 1 decimeter |
| 39.37 inches= 1 meter |
| 3280.8 feet or .62137 miles= 1 kilometer |
Temperature |
| To convert Fahrenheit to Centigrade: Subtract 32, Multiply by 5, then Divide by 9 |
| To convert Centigrade to Fahrenheit: Multiply by 9, Divide by 5, then Add 32 |
